About Ms Bettencourt

Ms Bettencourt is a Swedish built 25-foot trailerable trawler. Her hull was completed in 1971, No. 1117 of about 2500 built. The boat is named for my wife Dia, whose maiden name is Bettencourt.

This little vessel came to me as a gift in 2004. Before then she had been abandoned about 12 years on the Savannah River near Augusta, GA. I have repaired and refitted the boat extensively, and I have cruised her along the East coast of the US, from Cape Lookout, NC, to the Florida Keys. I dream of taking her to Havana some day.

This blog started in 2011 to chronicle the building of a hard top for the boat to replace leaky canvas. Since then the blog has become an Albin-25 boatkeeping and cruising journal.


Tuesday, December 31, 2013

Exhausted -- finally

Ms. Bettencourt has been immobilized for more than a month, with what turned out to be a stopped up exhaust system. It was like someone had stuck a potato up her exhaust pipe, but instead of a potato, it was a rust clot about the size of a tennis ball.

So, now we have an all new exhaust system.


The new mixing elbow is affixed to the aft end of the formerly rusty, newly-painted exhaust manifold. That red hose delivers raw water to the elbow to mix with and cool the exhaust gases.

(You can click on a photo to enlarge for greater detail).


We also installed a new segment of nearly- inflexible 2-inch wire-reinforced wet exhaust hose. This runs from the lower end of the mixing elbow downward to a 90-degree fiberglass elbow then out the back of the engine box. Exhaust gases and cooling water are then routed through....


... a new fiberglass muffler, brought in at the last moment to replace the 41-year-old original equipment rubber muffler which was found to have a hole in its underside.

With its exhaust unimpeded, Ms. Bettencourt's old engine now seems to be working happily.


Please note that this job was done in 2013. Next year, (tomorrow) I will set to work building a new deck panel that will accommodate the new exhaust mixing elbow, which is somewhat larger than its predecessor. After that, I'll have to clean and repaint all the places that got smoked, gashed, scratched and smeared with grease during the exhaust replacement project.

Maintenance can be tiring. I'll sure be happy when cruising season gets here.


Saturday, December 21, 2013

Good question

Sometimes, when I hit a dead-end on a mechanical problem, I'll ask my brother Paul in Memphis for ideas. Last week, I couldn't figure out how to enlarge an exhaust hose hole in Ms. Bettencourt's engine box, so I texted Paul. He suggested an approach that worked, so I emailed him a thank-you with the following pair of pictures.


Dia Bettencourt photos
... and he responded with this:

"Is that you in the bilge? If so, did Dia take the pictures? If so, if you are the Captain, why isn't she in the bilge?"

I suspect Paul will be getting an answer from Dia.

Meanwhile, work proceeds on the exhaust system (with Dia's able help).

And, I am hoping this project will be finished before the new year begins.


Saturday, December 14, 2013

Train wreck halts boat work

Here's an item for a book that should be written about bizarre boating events: After finally finding a rare (and costly) replacement exhaust mixing elbow, delivery is stalled by a train derailment in Illinois. I am almost afraid to ask what other new obstacles might arise to keep us hobbled at the dock.

Here's a picture of the beautiful new part which, until recently, was on the way from California to Ms. Bettencourt in Georgia via a UPS rail shipment.


News of the delay came from the UPS website which offered this rather matter-of-fact bulletin about my shipment's eastward progress: "Hodgkins, IL, train derailment."

I had this image of my bright blue casting sticking out of a snowbank by the railroad tracks a little south of Lake Michigan.

Anyway, I am relatively confident UPS and the railroad will sort it out and the part will get here eventually.

While we wait, there is work to be done.

The Kubota troubleshooters had loosened the exhaust manifold, which meant that the manifold gaskets needed to be replaced before things could start to go back together.


Removing the manifold revealed a nasty accumulation of rust, soot, grease and other stuff that begged for cleanup.

This is also a good time to take the big casting into the shop for degreasing, a scrub-down and a paint job.

The hardest part of getting this power plant back together will likely be wrestling the exhaust hose and the new elbow to the back of the exhaust manifold. The wire-reinforced hose is fairly rigid and there is a sharp upward turn from bilge level to the elbow at the back of the engine. The last time this job was done, it took three of us two days and many bloody knuckles.

This time, there's a different strategy. While the two-inch exhaust hose appears to be sound, it is in a stressful location and has been subjected to a lot of heat. So, the plan is to replace the four foot segment of hose that runs between the exhaust elbow and the muffler.


We will pass the new hose through its access port in the back of the engine box, and affix the new exhaust elbow to the hose. Then we'll bring the elbow and hose to the end of the exhaust manifold as a single assembly. This should give us better leverage to curve the new hose into place without kinking. If it works out, all that remains will be to trim the other end of the new hose to length to fit into the muffler.

That wooden plug you see in the end of the hose will be moved to the inboard end of the muffler when we withdraw the old hose. This is because the exhaust outlet at the transom is half-submerged on the water side. Bad things could happen without a stopper firmly in place.

The wayward exhaust elbow is now scheduled for delivery Tuesday. That means there is a possibility we could have everything back together and in working order before Christmas.


Sunday, December 8, 2013

Stopped up what??

Nothing is wrong with Ms. Bettencourt's old Kubota engine. Even her fuel injectors, which I removed and had tested last week, are in excellent condition. Then why wouldn't she run?

Her exhaust was stopped up. More specifically, it was this thing, (pictured here) called an exhaust mixing elbow.

When this elbow is working like it is supposed to, exhaust gasses from the engine enter it though the fitting in the lower right of this photo. At the same time, seawater from an on-board water pump comes in the brass fitting at the top.

This results in the exhaust gasses being mixed with cooling water, the sum of which is then ejected out the tube at the lower left, which is hooked up to a 2" hose that goes to a muffler then out the back of the boat.

The elbow stoppage was discovered by Kubota technicians, whom I had called in from the local tractor company after everything else I could think of failed. The fact that it took two certified technicians two visits to figure this out eased the hurt to my amateur diesel mechanic ego just a little.

So, how do we know that nothing is wrong with the engine? Simple. After the techs removed this elbow, they started her up and ran the engine up to full power. Ran beautifully.

Unfortunately, with the exhaust disconnected, all that black, sooty, oily, diesel exhaust had no place to go except all over my pristine, just painted, snow white middle cabin, including seats, decks, bulkheads, dashboard and the instrument panel.

Sigh. The four-day cleanup is just about finished.

My cruise buddy Major and I disassembled the elbow and mounting flange yesterday and, briefly, I thought we could clean the elbow out and put it back to work. Alas, that is not to be. The inside part of the casting appears to include a baffle or internal chamber designed to keep injected water from getting back into the engine. The baffle or chamber wall is mostly corroded away. I think it would be a bad mistake to put this chunk of iron back into service.

Now, I'm on the hunt for a replacement mixing elbow. Please look in again. I'll post an update when there is something to report.

Saturday, November 30, 2013

Triple injectorectomy

Ms. Bettencourt's 30-year-old Kubota diesel produced a spectacular plume of black smoke as we pulled away from the dock a couple of weeks ago, and full throttle refused to produce more than half-power.

A high-anxiety loop brought us back alongside the pier where I have been probing mechanical innards ever since.

Days have been spent following troubleshooting flow charts toward exhilarating peaks of likely problem solutions then to despondent lows of dashed results. And, most lately, to numbing dead-ends.

It is a fact, however, that black smoke and soot all over the transom is incontrovertible evidence of un-burned fuel. Also,the engine starts easily and idles smoothly. This means there is sufficient compression for fuel ignition.

These facts lead me to believe that the problem must lie with one or more of the fuel injectors, though individual injector tests with the engine running failed to identify a specific bad actor.

So, I think, all three injectors have failed to some degree.

As a result, with great difficulty, over a three-day period, we have come to a milestone:

Probably for the first time since Ms. Bettencourt's engine was built in the mid-1980s, its injectors are out and on the bench.


They will be going to a local diesel shop early next week.


 Her mobility thus challenged, Ms. Bettencourt will remain at the dock until this problem is sorted out. Please check back from time to time.  I'll post an update when more is known.


Tuesday, November 5, 2013

Electronics crashes!

Two very disappointing electronic failures have occurred, just as we enter the final lap of Ms. Bettencourt's center cabin rehab project.

Please recall that last week I had made new dashboard mounts for the GPS chartplotter, the depth sounder, the VHF radio and the compass.

This week I started to install and test the instruments and, right off the bat, my 3-year-old Garmin GPSMAP 546s dropped dead.

Press the "on" button and the Garmin logo appears, then fades away, and that's all there is to see. Garmin tech support was helpful, suggesting some new software from their site and an attempt at a "boot block" start-up.

That didn't work, so the unit is on its way back to Garmin and I am $270 lighter for a rebuilt replacement with a 90-day warranty.

The next bad news came from my brand-new Standard Horizon GX1700 VHF radio. I bought this radio last June and didn't even open the package until last week. The unit was installed Saturday and its send and receive functions performed as expected.

One key feature failed to function, however. This is a DSC, or Digital Selective Calling, enabled radio. It has an emergency switch that can be used to notify the US Coast Guard should a Mayday event occur. This system is dependent on the vessel's unique Maritime Mobile Service Identity, or MMSI, number being entered into the radio transceiver.

The new radio will not toggle through the routine needed to enter Ms. Bettencourt's MMSI number. The unit is useless to me with this limitation. The retailer is off the hook, because they have a clearly-stated 10-day return policy on electronics, and June was four months ago.

So, now I am waiting from a call back from Standard Horizon to see what has to be done to enter a defective product claim.

I suppose it's better to learn this kind of news while tied to the dock, rather than in the middle of a cruise.

Some days it's very hard to stay positive.


UPDATE 11/6/13: Defender Industries, from whom I bought the radio, went the extra mile and helped me work through the problem and get the MMSI number entered. John at Defender provided excellent phone coaching to get the job done. At the same time, Juan at Standard Horizon never let  go of the issue and I was presenting multiple alternatives by email. I am impressed with both firms' customer service.

I am now a relatively happy camper, awaiting only receipt of my replacement GPS from Garmin.


Sunday, October 27, 2013

Getting it together -- ever so slowly

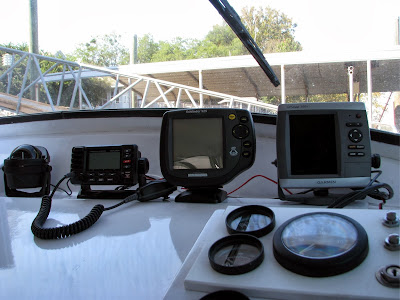
I am loathe to bore any more holes than necessary in Ms. Bettencourt's now pristine refinished dashboard, but the time has come to re-install the piloting instruments. After a lot of thought, I decided to mount most of the instruments on a leftover mahogany scrap, then screw the wooden mounting board to the dash.

The brackets for the VHF radio, the depth sounder and the Chartplotter have a total of eleven mounting holes. These were drilled in the mahogany billet, then the wood, which is about a half-inch thick, was affixed to the fiberglass dashboard with only three screws through trim washers.

The mahogany used for the base, left over from making a new mast last winter, turned out to have about the right shape to fit the curvature of the flat space under the windshield.

While it's beautiful wood, my wife the design consultant convinced me the plaque would look better painted.


She was right. Here's a photo shot from the inboard end of the now-painted mounting showing the VHF radio in the foreground.


The photo below shows the whole mounted array, shot from the steering position. Everything is visible and reachable.


All the power wires and data cables will feed down to the electrical panel below through a single, neatly grommeted, one inch hole a little forward of the instrument panel.

Notice the compass on the far left. I plan to raise it about an inch on a separate painted mounting block.


A decision remains to be made on where to place the microphone hanger for the VHF radio. I'm wary of the microphone's magnetic properties effecting the accuracy of the compass.

Perhaps I'll just leave it adrift until a better idea surfaces.


Thursday, October 17, 2013

Little things

Ms. Bettencourt's mid-cabin rehab project may be in the home stretch. The final coat of paint has been applied and the deck boards have been in the shop this week for scrubbing, patching, sanding and repainting.

And, a few little details have received some attention. For example, the Albin "commissioning plaque," found on the dash behind the steering wheel.


This little bronze plate had become tarnished and coated with diesel vapor over the years.

Soaking it in white vinegar for two or three days, then a vigorous rubbing with a fine Scotchbrite pad, brought it back to a like-new luster.


The engine access manhole cover from the top of the engine box also came back from paint-spattered decrepitude after some buffing with a drill-driven wire brush.

I am told the hole in the casting at the 9 O'clock position is to receive a screwdriver to lift up the top.

These things came from the factory with a sky-blue paint job around the Albin letters. I found a few blue paint vestiges, but decided not to try and repaint it.


I have sprayed both the plaque and the manhole cover with high-temperature engine clearcoat. I am hoping the clear top coat will help keep these parts bright.


The metal pieces will go back on Ms. Bettencourt tomorrow, along with the freshly re-painted deck panels (below).


I have also rebuilt the tri-fold plywood companionway hatch (far left in this photo).

When the decks are in and the hatch is installed, I expect to be nearing the end of this project.


There is still a fair amount of electrical re-installation to do and decisions remain to be made about instrument placements. But, this should go fairly fast.

Unfortunately, all this interior work is making Ms. Bettencourt's exterior paintwork look even more shabby.

Boat work never stops.


Sunday, September 22, 2013

Renewal progresses

Ms. Bettencourt's middle cabin is starting to look pretty good.

The first enamel coat went on Friday over a well-sanded thin primer coat.

The paint is Interlux Brightside, a one-part polyurethane product. You can get an attractive and durable finish with this stuff -- if the paint is applied in successive thin coats, with light sanding between coats.


The side benches, the aft bulkhead, deck and engine box also looked a lot better after the first finish application.


The plan is to let this paint cure a few days, then to give everything a 220-grit hand sanding to prepare for what I think will be the final finish coat.

The final painting and reassembly of the mid cabin will resume around mid-October.

Please check back in late October, by which time I expect the work to be nearing completion.


Sunday, September 15, 2013

A cloud of dust...

... and not much more.  A good paint job requires meticulous surface preparation. In Ms. Bettencourt's case, hours and hours of sanding, patching and filling must happen before the top comes off the first can of primer.

We're in the midst of an arid sanding williwaw in the middle cabin. Dust is everywhere. Vacuum cleaner filters are cleaned twice daily, and still it piles up. Particle mask filters are replaced frequently, and still we taste the stuff.

Resolve is diminishing only slightly. We're pressing on. The next report might contain pictures of painted surfaces.

Sunday, September 8, 2013

I was right!

In late July I predicted that Ms. Bettencourt's middle cabin rehab project would take a long, long time. I was right. It would be easy to get discouraged at this point, but there has been significant progress.

The following list reveals a slow and steady advance. As of today:

  • All of the wood work has been removed and is in various stages of refurbishment
  • A new bulkhead panel has been fabricated, painted, fitted and fastened
  • The steering station deck panel has been trimmed to fit the new bulkhead's profile
  • Surface preparation for the dashboard area is completed and is primer ready
  • The shore power panel is reinstalled
  • The dashboard storage compartment has been rebuilt
  • About 75 percent of other painted surfaces have been washed and degreased

Results so far are not pretty. The photo below, shot with my back against the transom in the aft cabin, could be a good "before" photo in a before/after sequence.


And the following view, looking aft, is just as stark.


More cleaning, and more surface preparation, including sanding and spot priming, will probably take another week -- unless it gets too hot to work.


Sunday, September 1, 2013

Notes from the boat carpenter's shop


Yes, Ms. Bettencourt is, nominally, a fiberglass vessel. But there is still a lot of wood inside. And,  a surprising amount of this wood must be repaired or replaced from time to time. Please recall the severely degraded bulkhead between the steering station and the head.


The plywood has de-laminated. Replacing this panel is not an option, since there is a lot of complicated plumbing and electrical wiring on the other side.

So, the plan is to fit a new panel on top of the old. The first step in this process is making a pattern. I couldn't find a big enough piece of cardboard, so I used some resin paper off a roll, with a cuff folded on the bottom to help stiffen it up.


Since the resin paper is more flexible than cardboard, it is easier to work with in tight places. Scribing and marking around the perimeter and various obstacles resulted in a serviceable pattern.


A lot of clipping and nipping after repeated fittings, then transferring the pattern to wood (which somehow needed even more tweaks before it fit), results in a replacement panel, shown on the left below, along with some other stuff that needed painting.


More wood items requiring replacement include the hinged companionway hatch boards over the doorway that leads to the forward cabin, and a rotted-out part of the compartment under the dashboard. I used the old wood as patterns in both cases. These parts will get three coats of sanding sealer, sanded between coats, before application of white primer and at least two topcoats.


There are also four fiberglass and epoxy-covered 3/4-inch  plywood deck panels that need to be cleaned up, sanded and repainted. 

So, work on the middle cabin rehab project seems to be picking up speed. I expect to be scrubbing down all the paintable surfaces soon to remove as much of the diesel vapor film as possible.

Then, it will be sanding and masking to prepare for a first coat of primer paint.

Sunday, August 25, 2013

Reluctant demolition

This all started with freshening up Ms. Bettencourt's dinged up and dirty dashboard and middle cabin. Then things got out of hand. I had not fully realized the fact that painting the interior of a boat requires removal of countless attachments --latches and brackets, fire extinguishers, bench hatch covers, removable bulkheads, doors and door frames, storage locker doors, switches, gauges, instruments and on and on.


Then there was the rot in the bottom of the little compartment under the dashboard. And now, as the photo at right illustrates, you can see right through that area.


Further pre-paint work led to the inescapable conclusion that no amount of pigment will help the plywood bulkhead separating the steering position and the head. It is badly de-laminated and looks terrible. Just ripping it out is not an option, since there is a major wiring chase and a lot of plumbing on the other side.

The not-so-simple fix for this will be application of a 3/16-inch veneer panel over the whole area. The new panel will dress up the old bulkhead and should strengthen the structure. But, to make it happen, a lot of other stuff will have to be moved, including the shore power distribution box.

Making a pattern, cutting, fitting and fastening that veneer panel will present some interesting challenges.

Meanwhile, the cockpit looks like the aftermath of a burglary.


And, of course. there is a patina of sanding dust fore and aft, all over everything.

Many boats are moving up and down the river.

Ms. Bettencourt has not been out of her slip since June 11.

We need to be on the water.


My friend Major and I talked this week about going down the river and over to Beaufort, SC, after this job is done.

I don't plan to rush the work, but my motivation level is increasing rapidly.

Sunday, August 18, 2013

Halting progress spawns new plan

Finally, a workable strategy for the dashboard repaint project:

I have decided to settle about midway on a continuum between perfect and good enough -- let's call it "the best I can do."

Instead of removing all the old paint and underlying gelcoat and filling every tiny little crack, I am sanding the whole surface very aggressively. I have begun with 60-grit sandpaper and my plan is to work down to a very smooth 120-grit sanded surface. All the dings, holes and cracks are being filled, as I work toward the best paintable surface I can achieve.

Life's too short to obsess about perfection.


Saturday, August 10, 2013

Chemicals fail...

...and the dashboard is still a mess. The chemical paint stripper I had hoped would ease the job of refinishing Ms. Bettencourt's dashboard doesn't work. The Georgia heat and humidity exceeds the product's application parameters. Temperatures here have been in the high 90s for days. The chemical gel stripper just makes a lot of evil fumes and a few paint blisters, then dries up and hardens. Even night-time applications fail.

There's another paint removal strategy I have hesitated to deploy: The heat gun.  Using the heat gun will require wearing a respirator and other protective gear, guaranteed to be very uncomfortable under burning sun and blanketing humidity.

Rain is expected next week. If things cool off, I'll take up the heat gun and a hand scraper and get back to work.

Meanwhile, thanks for looking in. If anyone has any better ideas for this job, I would sure like to hear them. Please use the comments box below.


Saturday, August 3, 2013

Thinking about paint (out on the snapper banks)

I began to sand the old paint off Ms Bettencourt's dashboard this week as a first step toward filling a network of unsightly dirt-catching cracks in the fiberglass surface. This was to be the start of a total refinishing for the whole pilot house area.

After grinding paint off a little less than a square foot of the 40-year-old dashboard, the project was paused for re-thinking.

This paint is highly resistant to mechanical removal. It is harder than Chinese arithmetic. It might yield to a heat gun and a scraper but that will be a last resort, since I fear fumes from blistering coatings would be dangerous in an enclosed space.

The idea of a chemical paint remover is only slightly more acceptable, but that's the direction I plan to take next. There is a gel product that is said to be safe for use on fiberglass. I have ordered a quart for pick up in Savannah Monday.

And since I have to go to Savannah to get the stuff, I might as well go deep sea fishing.

That's why this post is such a short one.

There may be a dashboard stripping progress report next week.

Saturday, July 27, 2013

This could take a very long time

Ms. Bettencourt's dashboard looks a little like a Google Earth view of prairie farmland around Pawnee Rock, Kansas. There are strangely regular road-like networks of tiny little cracks across most of the horizontal surfaces.

This is nothing new. This is the way the boat came to me some years ago. And it's not just my boat. I have seen this same phenomenon on a dozen or more Albin 25s.

I thought I had Ms. Bettencourt fixed after a complete repainting about eight years ago. But I was wrong. The cracks reappeared and, once again, began collecting ugly grime.

One correspondent suggested these little flaws are a result of a design that allows too much flexing around the dashboard area. He wrote that he thinks the cracks are in the gelcoat (under my earlier paint job), and the only fix would be to grind the gelcoat down to the underlying fiberglass, then repaint again.

I picked one of the worst areas and started grinding. A problem arose almost immediately. The larger cracks go through the gelcoat and relatively deeply into the fiberglass below. I found a few more than 0.5mm deep. I think that's too deep to grind out.


The cracks are hard to photograph, but if you click to enlarge this picture you should be able to see some larger fisures, including the crevice at the point of this tool.

So, here's Plan-B. I am going to grind off as much as the old paint as possible and clean the network of crevices as best I can. I'll use a dental pick and a Dreml rotary tool with a conical bur bit for the crack work. It will be tedious and slow.


The sanded patch above is about an hour's work with a Dreml oscillating tool. The Dreml out-performs my other sanding machines, but I have to stop frequently to let it cool off.

After the dashboard and surround are sanded and prepped I am going to try an application of Interlux Surfacing Putty  http://tinyurl.com/me3kdhf . The spec sheet on this product says it is compatible with Interlux PreKote primer and Interlux Brightside one-part polyurethane paint, which are the primer and finish coatings I plan to use.

The dashboard crazing is so widespread that, practically, I have little hope of perfection. I'll try to find, clean and fill the largest and deepest canyons and to sand as much as the remaining crazing as level as possible.

More sanding will be required to fair the surface.

This could go on forever.

Saturday, July 20, 2013

Middle cabin project begins

Ms. Bettencourt's center cabin, the area that provides interior access to the rest of the boat and from which the vessel is operated, is in need of major refurbishment. The overhead and bulkheads were painted when the new top went on more than a year ago, but the dashboard, the seats and the deck can only be described as nasty.

The dashboard is the trickiest part of the job, since all the electronics, other instruments, controls, gauges and switches must be removed before the surface can be prepared for repainting. That part of the work started yesterday and was finished today.

Tracing, disconnecting and tagging electrical and antenna connections was a tedious task. This photo shows the electrical panel and the underside of the dashboard. All those colored tags will help me get everything back where it goes at the appropriate time.

I was able to lift and block up the main instrument cluster and the engine shift and throttle controls without having to make major disconnections. That's a feature I'm glad I thought of when  Ms. Bettencourt's instruments and controls array was restored about 10 years ago.


So, here's what it looked like this afternoon, following removal of the steering wheel and everything else that needed to move. If you click to enlarge this photo you will be able to see how I have the main instrument cluster blocked up with wood scraps so I can clean, sand and paint under its edges.

While this doesn't look too bad from a distance, the following shot, closer in and from a different angle, reveals why refinishing is a priority.


Enlarging this picture will show some of the cracks, dings, dirt, epoxy splats and other imperfections I expect to fix in coming weeks.


Re-doing the dash will also present an opportunity to play with the placement of communication and navigation devices that have been added around the steering area piecemeal over the years.

Ms. Bettencourt won't be going anywhere until all this is refurbished and reassembled. There's a lot more work to be done in the middle cabin, but the dash is the most difficult and the rest should follow fairly rapidly.


Saturday, July 13, 2013

"How high's the water, Mama?

...six feet high and rising ...."  It has been raining here all month, and not a day goes by without those lyrics from a Johnny Cash ballad popping into my mind.The water level in the Savannah River outside our back door seems to have stopped rising, but the water velocity has increased substantially.

The river is booming past our dock at about 46,400 cubic feet per second (according to the nearest US Geological Survey stream monitor gauge), bringing with it large quantities of logs and other flotsam.

The usual summer flow rate here is about 3,800cfs. This time last week, Engineers were releasing 16,000cfs.

That soggy and un-mowed  swatch of green in the foreground of the photo above is part of our lawn. The floor of the gazebo to the left in this photo is usually about eight feet above the water.

And it continues to rain and rain and rain.

All of the three large dams upstream from our home are full to over-full. The Army Corps of Engineers, manager of the dams in the Savannah River watershed, is releasing water as fast as it can without causing undue downstream damage.

In a report yesterday,  Engineers estimated it will take three weeks to a month of water releases at the present rate to bring the reservoirs down from flood to storage levels. That estimate assumes rainfall will moderate soon.

Army Corps of Engineers photo


Also yesterday, about a thousand people showed up at the Thurmond Dam to witness a timely test of the structure's 23 floodgates. The floodgates apparently worked satisfactorily.


All the rain has caused the atmosphere to be really funky inside Ms. Bettencourt. The relative humidity seems to be approaching mushroom growing levels.

I have been fighting mildew on the overheads, bulkheads and decks. Condensation under the bunk mattresses has become such a concern that I will bring the mattresses into the house if it ever stops raining. The pilot house windows and all the under-seat lockers are open, with a large fan running in the forward cabin. Perhaps air movement will help abate the fungus.

Painting inside the pilot house cabin in such weather is out of the question, but I have begun some halting surface preparation.

Even a little sunshine would be very motivating.


Saturday, July 6, 2013

A stormy time on the river


It appears that the drought has ended in this part of the Southeastern United States. It has rained abundantly for much of the last two weeks. All three of the large Savannah River impoundments upstream from our dock are now full. In fact, the largest is over-full. The Army Corps of Engineers is trying to do what it calls "balancing the basin" by increasing outflows to match watershed inflows, while holding lake levels as full as safely possible.

Before the recent rainfall torents, engineers were releasing only enough water from the dams to assure minimal river flow to the Port of Savannah. Until last week, this was about 3,800 cubic feet per second, as measured at Thurmond Dam on the lake at the southernmost end of the system. This morning, the flow was about 16,000 cfs.

One result of the increased flow is that all the junk, old limbs, tree trunks and other stuff that had been above the previous high water mark,  has been washed adrift. A lot of it piles up on our dock, necessitating twice-daily logjam clearing work. I use an old 6-foot oar as a lever to move the stuff out into the stream.

While the water flow is five times what we usually see here, the present volume is not particularly worrisome. In the 12 years we have lived on the river, we have seen flows of more than 30,000 cfs at least a couple of times, with water levels rising as much as eight feet.

Interestingly, in spite of the the much greater volume of water, engineers have held the water level in our area of the river close to the usual depth. There is a small dam with a lock about 13 miles downstream from our dock. Engineers must be managing releases from that dam to hold the pool level relatively constant.

Army engineers are walking a water management tightrope, trying to balance current and expected inflows with dam releases. Full reservoirs, continuing high levels of rainfall and the impending Atlantic hurricane season pose a potentially destructive scenario: What if a hurricane develops and dumps even more water in the basin?

Nothing like that is predicted at the moment, but engineers have announced they will be testing the floodgates at all three dams next week. All of Thurmond's floodgates have not been opened since 2007.


Ms. Bettencourt, meanwhile, is untroubled by these phenomena.

As evidenced by the spider work on her stern line, she has not moved in some time.

Her cooling system overhaul was completed and tested for leaks last week.

There was no sign of  overheating during a prolonged period of running the engine at.the dock.

The real test, however, will be a long run at about 80 percent power.

There will be such a run in a few days. Then, assuming everything works as expected, the current plan is to spend the rest of the month relocating some dashboard electronics and repainting the pilothouse cabin.

After that, it's down to Savannah for some coastal cruising.


Saturday, June 29, 2013

Inconclusive autopsy

After disassembling and inspecting  Ms. Bettencourt's entire raw water cooling system, I have been unable to find any clear-cut cause for the old diesel's intermittent temperature spikes. I have removed, cleaned and reassembled the heat exchanger and removed the raw water pump and replaced its impeller. I have checked all the passages in the pump. All of the hoses are being removed and replaced.

I didn't think the heat exchanger looked too bad, but there was some sand in it and a scrap of broken impeller from some previous melt-down. A long soak in vinegar may have removed some occult scale and might improve performance.

The photo at right shows the pump with the (black) impeller I removed and replaced. The take-out impeller looks a little ragged, but, again, unlikely to be dysfunctional. I put the new blue impeller in the photo for comparison purposes.


 Here's a closer look at the old and new impellers.

The take-out impeller had been in use about 200 engine hours. The comparison impeller is a different brand, but otherwise compatible with the Oberdorfer pump. You may click a photo to enlarge if you would like a closer look.


The result of all this work will be a cleaned out a raw water cooling system with all the soft components and clamps replaced, and a neatened-up engine box. If the overheating problem persists, I can at least be confident that the cause is not in the raw water cooling system.

I am putting it all back together now. There will be a test run sometime soon.


Saturday, June 22, 2013

Problem search expands

Please recall that on her last voyage Ms. Bettencourt's old diesel began to exhibit some troubling temperature rises. After checking the usual suspects, it seemed to me that the problem was either a disintegrating cooling water pump impeller or a clogged heat exchanger.


I removed the end cover from the pump (if you click to enlarge this photo, it's that doohicky left center that says "Oberdorfer" on it).

Anyway, the impeller looked OK, so I moved on to remove the heat exchanger. This revealed that front end of this engine really needs a cleanup, so here's an obvious project expansion.

With the heat exchanger on the bench with its end caps off, I looked down the barrel expecting to find at least some clogged passages.


Actually, it didn't look too bad. A length of wire moved through the small passages easily. There was some sand,  and, surprise, a piece of water pump impeller. This clue will lead me to look under the Oberdorfer cover yet again, this time more carefully.


I have ordered new end caps and gaskets for the heat exchanger and they won't be here until Wednesday, so there's time for a more thorough heat exchanger cleaning;.


The heat exchanger goes into a tank of vinegar for a long soak. Helpful hint: old plastic tool boxes are often big enough to accommodate strange shaped parts for soaking.


Meanwhile, it's time to check the sacrificial anode. The take-out part does not measure up.


The zinc on the left has obviously been doing its job and will be replaced by the spare on the right.

Those discs at the top of the photo are the end cap gaskets, which will also be replaced.

The black rubber sliver in the foreground is the impeller piece found in the cooling water intake end of the heat exchanger.


After two days in the vinegar bath, the heat exchanger comes out looking relatively shiny.


The vinegar turned black during the soak and I found a lot of grit and small black flakes in the fluid.

I blasted both the large and small passages out with the garden hose and got only clean water out the ends. Perhaps all this will improve the heat exchanger's performance. But, I doubt that the amount of stuff I cleaned out of this heat exchanger will explain the 4-5F engine temperature creep that started this whole project.

Incidentally, a further explanation of the anatomy of this device might be in order. Here's how it works: The engine coolant (antifreeze) goes into one of the  big elbows shown in this picture, through a large central tube, then back to the engine via the other elbow.

Cooling water, supplied by the Oberdorfer pump, goes in and out of the small inlets at the bottom of this photo. The water circulates through many smaller tubes around the central tube, then goes out through a hose that connects to the exhaust elbow at the other end of the engine. In this photo, the sacrificial anode screws into the fitting at the top right of the cylinder.

Anyway, the story isn't over yet, because I am not convinced the cause of the problem has been found. While I am awaiting parts, I'll give the raw water pump impeller a closer look, and probably replace it. And since I have the whole thing apart, I'll replace all the hoses and hose clamps and de-grease and clean the front of the engine.

At this point, I can't imagine how this project could snowball any larger, but that doesn't mean it won't. Please check back later for a report on results.


Monday, June 17, 2013

Taking subtle hints seriously

Ms. Bettencourt is back at her home dock after an uneventful highway trip back from the St. Johns River and Tropical Storm Andrea.

Unpacking was delayed by continuing rain and intervening duties. Today was devoted to sorting through the post-cruise detritus, re-stowing, refueling and a general cleanup.


Ms. Bettencourt's exterior is starting to look a bit dowdy. She needs to have her cabintop rails removed and refinished and to be stripped and repainted from the rubrail to the hardtop eaves.

She has a reservation for a slot under the shed at the Augusta Ports Authority at the end of the month.

Meanwhile, I am pondering a couple of powerplant developments that surfaced during the Florida trip: The engine was running a few degrees hotter than comfortable, and the transom was blacker than usual with soot at the end of the trip. I am more worried about the former than the latter.

I think the soot on the transom was the result of a hard four-hour run at nearly 80% power. We pushed the engine for an extra 1000 rpm, trying (successfully) to get to a marina before closing time.The carbon scrubbed off fairly easily. I included some Cetane Boost additive with the red off-road diesel at fill up. We will be less heavy-handed on the throttle in the future.

The temperature creep, on the other hand, is a serious matter. Ms. Bettencourt's engine, a marinized three-cylinder Kubota tractor motor, is one of about only 1100 of its kind built between 1977 and 1983. The engine is known to be "bulletproof"  if well-maintained. Up until now, she has held her operating temperature steady at 180F. At times on our most recent cruise, however, the needle has moved alarmingly close to185.

Even small changes in such an old machine are to be disregarded at the operator's peril. So, after checking to assure a free flowing cooling water intake and a full antifreeze reservoir, I am beginning to think there may be a problem with the heat exchanger. (It's that brass cylinder shown at the bottom of this photo).


A boat engine heat exchanger functions as a radiator does for a car motor. In a car, air flowing over engine coolant circulated through the radiator removes heat and keeps the engine running within specifications. On Ms. Bettencourt, the cooling medium is raw water from the river, lake or ocean upon which the boat is floating. Engine antifreeze is circulated through a circuit inside the heat exchanger. Raw water pumped into the heat exchanger and around the coolant circuit removes heat from the engine antifreeze.

Tomorrow, I'll check the raw water pump impeller and pressure test the coolant expansion tank cap. If these components are within specs, the next step will be removal of the heat exchanger for inspection and, if necessary, repair.

It would not be surprising, in an installation this old, to find calcified or otherwise obstructed raw water passages in the heat exchanger. If this turns out to the the case, the fix should be fairly easy.

Please check back for an update in a future post.


Saturday, June 8, 2013

Listening to the weather gods

This morning’s highlights: Tornado Watch. Flood Warning. Local rainfall up to 5 inches. Three inches of rainwater already accumulated in the dinghy. Tropical Storm about 200 miles southwest, moving northeast.

And here we are in Florida, at Hontoon Island State Park, thinking about continuing south on the St. Johns River to Sanford. “What do you think we will do when we get to Sanford?” I ask my cruising buddy Paul.

“Probably sit in the boat in the rain and think about calling for delivery pizza,” he replies without hesitation.

“The weather gods are trying to tell us something. We may never get to Sanford.”

In my role as Captain, I reason that since the weather gods have already sent us Andrea, the first named storm of the Atlantic hurricane season, perhaps we should take heed. Have a look:


Uniform of  the day ... day after day after day
Looking for sunshine... without success


Pitching and rolling on Lake George


Waterproof osprey chicks 


As this is being written, Ms. Bettencourt is retreating northward.

We have seen some nice wildlife – bald eagles, many ospreys with young, wading birds, a congregation of wood storks, and countless alligators. 

And, since even a stormy time on the water is better than pushing the lawnmower, this trip is still a success.


We expect to be back at Acosta Creek Harbor before dark, and on the road to Augusta tomorrow.